Let's Chat
Lose Belly Fat Workouts

Best Exercises For Reducing Belly Fat At Home And Expert Tips

Do these exercises to fire up your core and get a toned and flat tummy.

Getting rid of the stubborn fat in your belly region is not easy. You must do certain exercises to reduce belly fat. The AARP warns that people with belly fat are at a higher risk of heart disease, diabetes, stroke, and certain cancers (1). Combat abdominal fat by exercising and changing your lifestyle. This article tells you what to do to reduce and manage belly fat effectively. Take a look!

15 Best Exercises To Lose Belly Fat

Certified Personal Trainer TJ Mentus says, “Cardio and aerobic exercise are great for improving your overall health — especially heart health — and burn calories both during and after the workout. So it is good for weight loss overall. But I would also say whether they help lose belly fat specifically depends on a person’s genetic predisposition to hold fat in certain places. No activity can guarantee that belly fat would be the first to go or the main area of weight loss.” So manage your expectation accordingly.

*Warm up for 10 minutes before starting these exercises. After your muscles are warmed up, take a 10-second break and start with the following exercises:
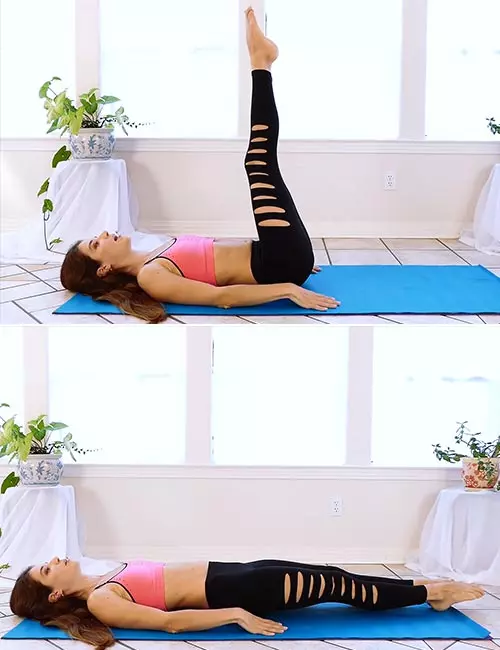
 

1. Lying Leg Raises


Target – Lower abs, upper abs, glutes, hamstrings, and quads.

How To Do
  1. Lie down on a mat. Place your thumbs under your hips, palms flat on the floor. Lift your feet off the floor a little, look up at the ceiling, and engage your core. This is the starting position.
  2. Raise both your legs to 90 degrees and slowly bring them back down.
  3. Right before touching the floor, raise your legs again. Do 3 sets of 15 reps.

What Not To Do – Do not place your feet completely on the floor or push your hips up with your hands to lift your legs.
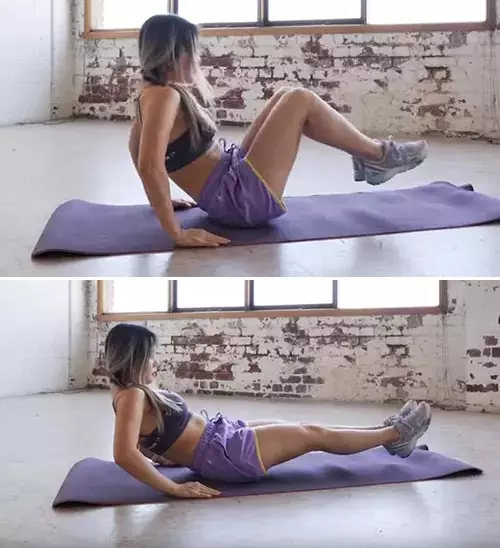
2. Leg In And Out


Target – Lower abs, upper abs, glutes, hamstrings, and quads.

How To Do
  1. Sit on a mat. Place your hands behind you, with the palms flat on the mat. Lift your legs off the floor and lean back a little. This is the starting position.
  2. Tuck both your legs in. Simultaneously, bring your upper body close to your knees.
  3. Go back to the starting position. Do 2 sets of 20 reps.

What Not To Do – Do not place your hands too wide apart at the back.

3. Scissor Kicks


How To Do
  1. Lie down on a mat. Place your palms under your hips.
  2. Lift your head, upper back, and legs off the floor. This is the starting position.
  3. Lower your left leg. Just before it touches the floor, lift your left leg and lower your right leg.
  4. Do this 12 times to complete one set. Do 3 sets of 12 reps. Take a 20-second break before moving on to the next exercise

What Not To Do – Do not do this exercise quickly or hold your breath while doing it
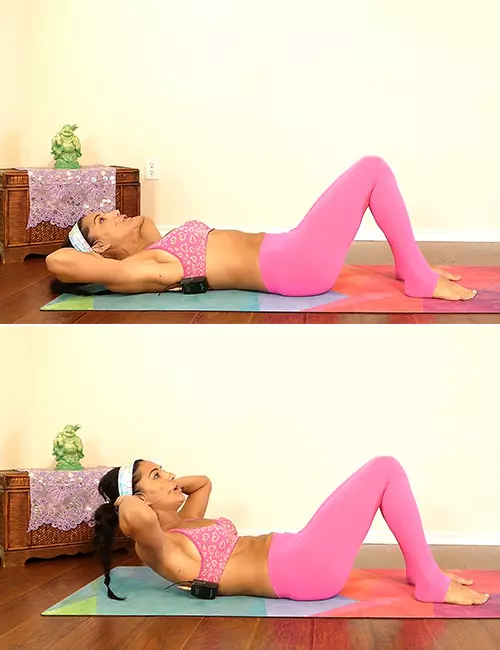
4. Crunches

Target –Lower and upper abs.

How To Do
  1. Lie down on a mat, flex your knees, and place your feet on the floor.
  2. Place a thumb at the back of each ear. Hold the back of your head with the rest of the fingers. Lift your head off the floor. This is the starting position.
  3. Initiate the movement by curling up and trying to reach your knees with your head.
  4. Go back to the starting position.
  5. Make sure you inhale while curling up and exhale while going down. Do 2 sets of 12 reps.

What Not To Do – Do not tuck your chin in.

5. Bicycle Crunches


Target – Rectus abdominis, obliques, glutes, hamstrings, and quads.

How To Do
  1. Lie down on a mat, flex your knees, and lift your feet off the floor.
  2. Place a thumb at the back of each ear. Hold the back of your head with the rest of the fingers. Lift your head off the floor. This is the starting position.
  3. Push your left leg down and extend it straight. Simultaneously, curl up and twist to your right. Try to touch your left elbow with your right knee.
  4. Curl back down and bring your left leg back to the flexed position.
  5. Do the same with the other leg. Do 2 sets of 12 reps. Take a 10-second break before doing the next exercise.

What Not To Do – Do not hasten to complete the sets, and do not tuck your chin in.
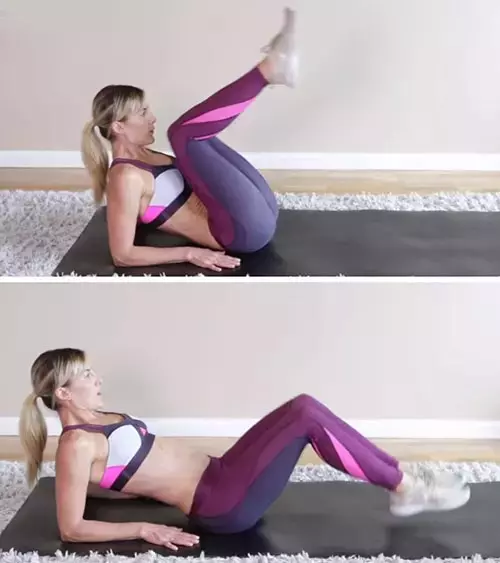
6. Half Seated Reverse Crunch

 
How To Do
  1. Sit on a mat, flex your knees, and place your feet flat on the floor. Lean back and support your body on your elbows. This is the starting position.
  2. Lift both your legs off the floor and bring your knees almost close to your nose.
  3. Slowly, bring your legs down to the starting position. Do 3 sets of 15 reps.

What Not To Do – Do not scrunch your shoulders or curve your lower back too much.
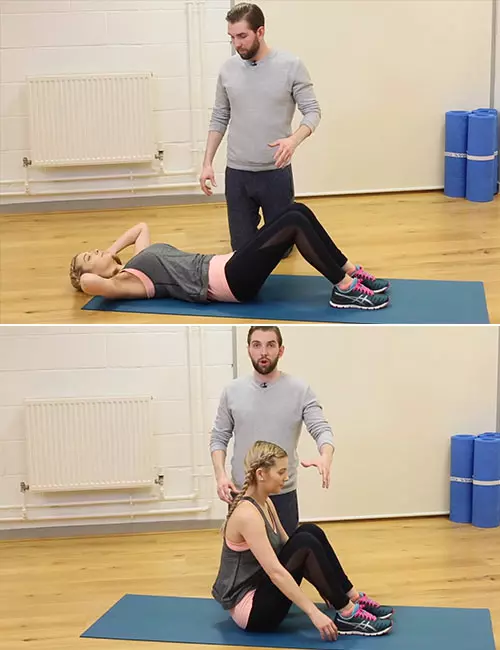
7. Sit-ups


Target – Rectus abdominis

How To Do
  1. Lie on a mat, flex your knees, and place your heels on the mat. Engage your core and place your hands at the back of your head. Lift your head and shoulders off the floor and look at the ceiling. This is the starting position.
  2. Use your core strength to lift your body off the floor and come to a sitting position.
  3. Go back down to the starting position slowly. Do 2 sets of 12 reps.

What Not To Do – Do not get confused between sit-ups and crunches. You need to literally sit up and go back down to the starting position to do sit-ups. Do not bring your elbows close while sitting up.
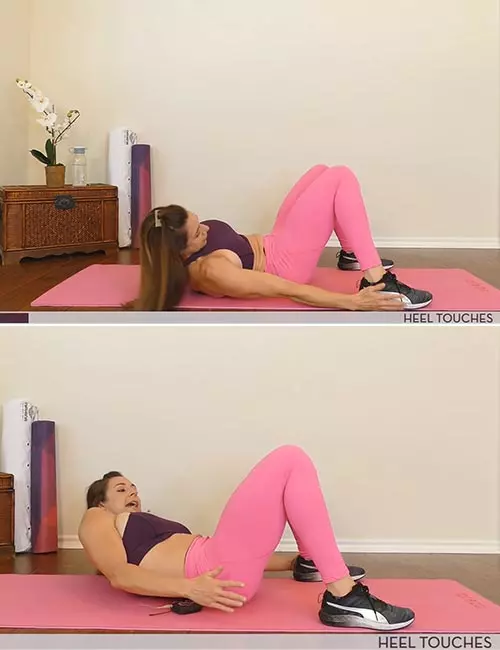
8. Heel Touch


How To Do
  1. Lie down on a mat. Keep your legs flexed, feet wider than shoulder-width apart, and flat. Keep your hands by your side, chin up, shoulders relaxed, and core engaged.
  2. Bend sideways and try to touch your right heel with your right hand.
  3. Bend toward the other side and try to touch your left heel with your left hand.
  4. Do 20 of these to finish one set. Do 3 sets of 20 reps. Take a 20-second break before moving on to the next exercise.

What Not To Do – Do not place your feet too close to your hips.
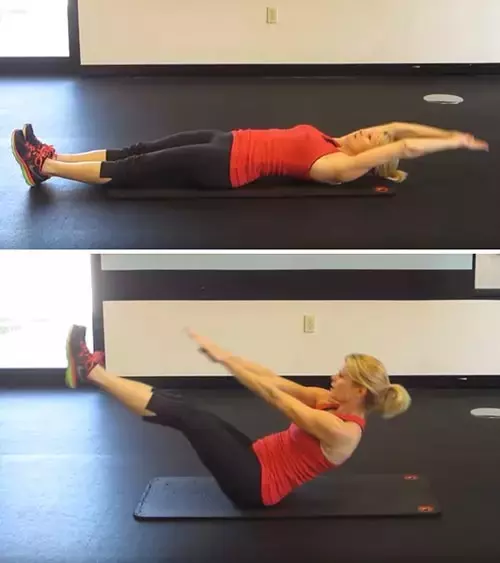
9. Jackknife Crunch

Target –Lower abs, upper abs, glutes, hamstrings, and quads.

How To Do
  1. Lie down on a mat. Extend your hands over your head. This is the starting position.
  2. Keeping your back and neck in the same line, lift your upper body. Simultaneously, lift both your feet off the floor.
  3. Try touching your knees with your hands.
  4. Get back to the starting position. Do 3 sets of 12 reps.

What Not To Do – Do not rest your head on the floor completely between repetitions.
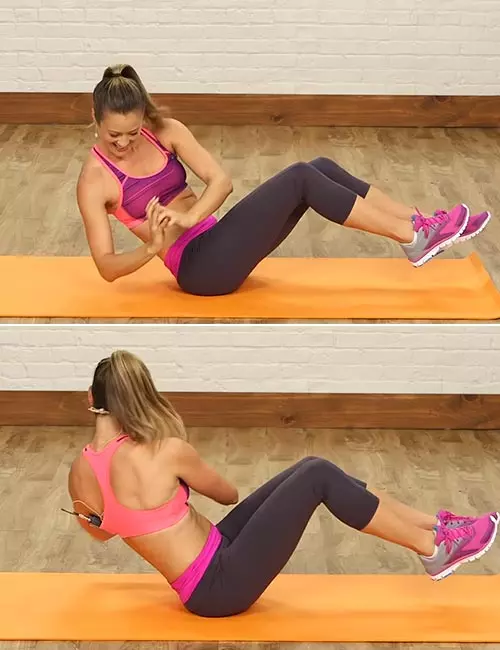
10. Russian Twist

How To Do
  1. Sit on the mat, lift both your legs, keep your knees flexed, and lean back a little. Join your palms to balance your body. This is the starting position.
  2. Twist your upper body to the left and then to the right.
  3. You may do 3 sets of 12 reps for best results.

What Not To Do – Do not hold your breath while doing this exercise.
Did You Know?
Lunge twists are another great exercise for beginners who are looking to reduce belly fat at home. This lower body exercise improves the flexibility of the hips and strengthens the legs as well.
 

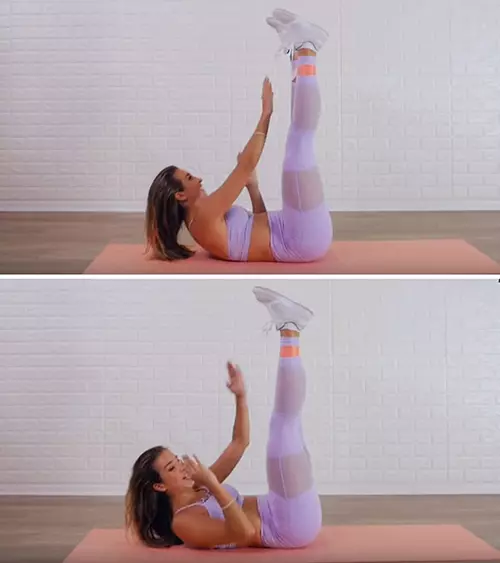
11. Lying Alternate Toe Taps


Target – Rectus abdominis, obliques, and glutes

How To Do
  1. Lie on the mat and lift both your legs at a 90-degree angle.. Extend your hand up, lift your head and upper back off the floor, and engage your core. This is the starting position.
  2. Curl up and try to touch your left foot with your right hand.
  3. Curl back down.
  4. Curl up again and try to touch your right foot with your left hand. Do 2 sets of 15 reps.

What Not To Do – Don’t worry if you are not able to touch your foot. Try reaching beyond the knee and as close to the foot as possible.
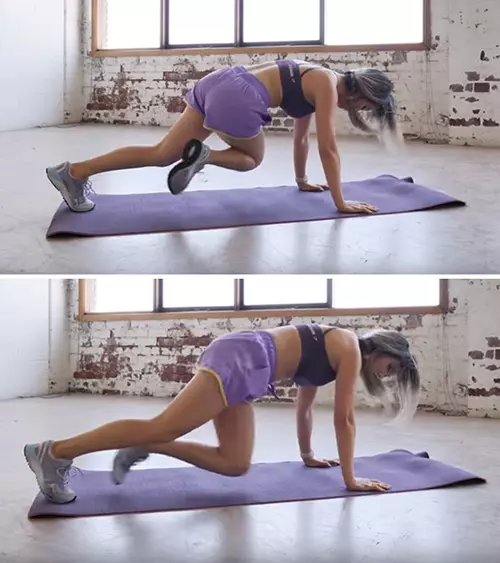
12. Crossbody Mountain Climbers

Target – Rectus abdominis, shoulders, core, glutes, hamstrings, and quads.

How To Do
  1. Get into a push-up position. Make sure your elbows are directly below your shoulders. Keep your neck, back, and hips in a straight line. Do not pike up and curve down. This is the starting position.
  2. Lift your right foot off the floor, flex your knee and bring it close to the right side of your chest.
  3. Place the right foot back to its starting position. Now, lift your left foot off the floor, flex your knee and bring it close to the left side of your chest.
  4. Speed up and do it as if you are running! Do 2 sets of 25 reps. Take a 20-second break before doing the next exercise.

What Not To Do – Do not place your palms too far away from your body, and do not droop your neck or lower back.
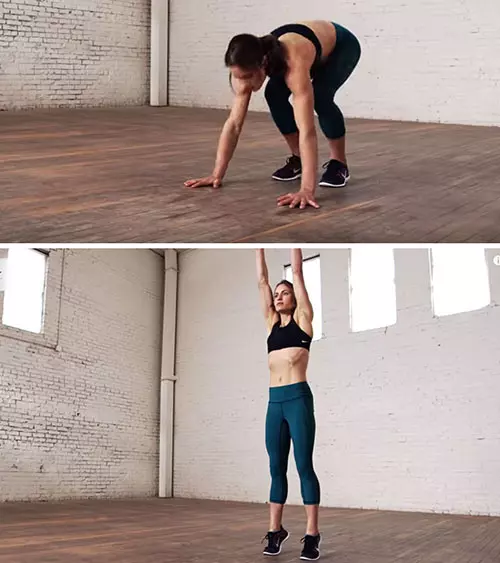
13. Burpees

Target – Full body workout that also targets your abs.

How To Do
  1. Stand straight with your feet shoulder-width apart.
  2. Bend your knees and place your hands on the floor. Let’s call this the “frog” position for clarity.
  3. Jump and push both your legs back and get into a plank or push-up position.
  4. Hop and get back to the “frog” position.
  5. Jump vertically and extend your hands above your head.
  6. Land softly on the floor.
  7. Get into the frog position again, then go back to the plank position. Do 3 sets of 8 reps. Take a 10-second break between the sets. Also, take a 20-second break before moving on to the next exercise.

What Not To Do – Do not set unachievable goals. Burpees are tough to do. The number of burpees you do does not matter. What matters is how many you do while maintaining correct posture.
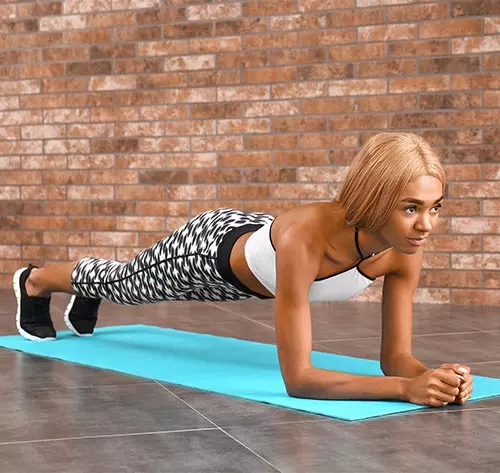
14. Plank

Target – Rectus abdominis, core, shoulders, biceps, and glutes.

How To Do
  1. Kneel down on a mat.
  2. Place your elbows on the mat.
  3. Extend your right leg back, then your left leg.
  4. Keep your neck, back, and hips in the same line. Keep your core engaged.
  5. Hold this pose for at least 30 seconds. Do 3 sets of 30-60 seconds hold.

What Not To Do – Do not place your palms far away from your shoulders. Do not droop your lower back or pike it up.
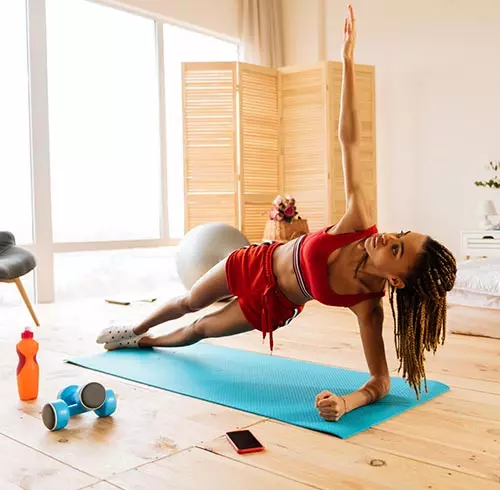
15. Side Plank

Target – Abs and core, shoulders, biceps, and glutes.

How To Do
  1. Get into a side half-lying pose on your right. Place your left foot across the right foot and on the floor.
  2. Place your elbow right below your shoulder and your left hand on your waist.
  3. Lift your pelvis off the floor. Your back should be in line with your neck and head.
  4. To make this a little tough, open your left hand wide.
  5. Hold this pose for 30-60 seconds. Keep breathing.
  6. Lower your body. Take a 10-second break, change sides, and do the same on the other side. One set of this exercise is enough for beginners. You may increase the time and sets as you progress.

What Not To Do – Do not droop your pelvis.

To make it more effective and quick for you, here’s advice from 8 fitness experts. Scroll down!

Back to top